Friday, August 12, 2011

Making the most of your Inflatable Pool


Inflatable pools have come a long way in recent years, and with the right tools, toys and tricks you can turn them into a great (and convenient) playground at home!

I live in the mountains, there is not a level spot on my property, but I have a GREAT deck.  I found a great size inflatable pool for under $20...filled it up and let er rip (not literally though!).


With this particular pool, I did not inflate the top level as much, which allowed my 14 month old ease of exit and entry (to some degree).


Additionally, I put a great "standing toy" in there...haven't been able to find it on Amazon as I got this one at a yard sale, but another one that would work would be the Fisher-Price Little Superstar Jammin' Band Musical Microphone (I used to have this one and the legs are nice and flat which would keep a toddler from tripping over any unseen parts.  Vivian would use this at times to get in and out of the pool, but also had a ball playing with it in the pool.

Also, even in the summer up here, we have a LOT of leaves.  Not sure how they fall year round, and when I look up they all look green!  I actually got a splatter screen out of my kitchen and have been using that to clean the pool.  It works great, and it's rigid enough that it enables me to get out the little particles.


So Vivian LOVES her inflatable pool.  A big problem when we first got it was that it got slick on the bottom pretty quickly which caused her to slip and fall a little too much.

I did some research and found solutions from vinegar to baking soda.  I cleaned it completely, but the main problem was that I had to keep filling it up after 2 days or so, and who can afford to waste that much water!

Finally, I found a solution that worked.  I sprinkled just a little bit of spa shock (which I had already with my hot tub chemicals) into the pool.  I then got in it and stomped around to agitate the water.  All clear in a matter of minutes!  Make sure not to use too much, and to be on the safe side, wait at least 4 hours before your child gets back in.  Using this solution, I can keep the same water in there, clean and clear for weeks at a time!  It's also quite cheap and one container of this will last you FOREVER!


Another thing that I did was I got a smaller inflatable pool (couldn't resist a good deal).  Initially I tried putting the small one inside the big one (before I solved the issue with the slick bottom).  That was just okay...at one point I had the little one emptied and it was sitting beside the larger one.  Vivian climbed in and took a bunch of her toys into there and had a blast.


Another great trick.  You find ball pits everywhere for like $200.  I bought a bag of plastic balls at Walmart for something like $10 and put them in both pools.  It adds hours of entertainment!  Here's the one I found on Amazon, still a great deal especially if you get free shipping. 


Baby pools and inflatable pools can be a BLAST!  Be sure to follow all safety protocols and NEVER EVER leave your child unattended in the pool.


Friday, February 18, 2011

Childproofing Open Stairways

Supplies needed for open air stairways/open shelves childproofing:
  • Plexiglass
  • Jigsaw
  • Wood Screws
  • Drill
When it came time to childproof in my house, I was perplexed when problem-solving my stairway.  I have one of those houses that was built during a time in the 70's that said, "the busier the better".  When it comes to the stairs, not overly functional, not overly pretty, and a major pain!  Prior to having Vivian, I struggled with how to deal with these stairs in general.  The shelves were narrow and things tended to fall off!  Parts of them I blocked with various pieces of furniture...and then it came time to childproof!


As you can see, quite a childproofer's dilemma!

Initially, a very wide gate was purchased...the idea there was to basically block off the entire area.  This solution wasn't going to work because the gates that were wide enough were stabilized by being too tall!  I stared and stared and stared at my stairs...and then it came to me!  Plexiglass!

Plexiglass is a great solution to childproofing open spaces such as this one.  You can keep the "beauty" of the space while making it safe for your little one.

You can purchase plexiglass at any major hardware warehouse store.  Then, cut it to size (you can use a box cutter but it takes forever).  Best bet for cutting it is to use a jigsaw with a blade that is suitable for plexiglass/plastic.  This part was trial and error as I used a rotary tool one time, which only melted the plastic making it even HARDER to cut through!

After cutting it to size, make sure to PRE-DRILL holes in it...don't get all crazy and try to put screws directly into it.  Works best if you drill the holes while bracing it against the wood.  Plexiglass can be unforgiving, so measure, cut and drill carefully!  One mis-sized screw or incomplete cut and you can break it off at the wrong spot!

You can line up plexiglass very easily and even line it up against carpet.  It's virtually invisible to the casual onlooker!


Backside view of plexiglass with screws.  Virtually invisible from the front.


bottom showing lineup with carpet and with other plexiglass.  Considering adding something in the groove, but that would make it visible on other side.


you can use larger pieces for larger spaces


Aside from the line between pieces, the plexiglass, if kept clean, keeps your shelves looking good and keeps baby from crawling under open spaces!

Wednesday, February 2, 2011

What we think about the Papillon Baby Bath Ring


After reading several favorable reviews of the Papillon Baby Bath Ring, we thought we'd give it a whirl...

Papillon Baby Bath Tub Ring =

While the price seemed a bit high for something that was a combination of polyester, spandex and polystyrene beads, the thought of Vivian having the freedom to goof off in the bathtub was more appealing.

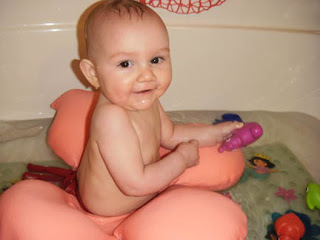
When the Papillon ring arrived, I was somewhat disappointed in the color.  I had ordered pink and this was a salmony-coral color.


Of course, this didn't bother me too much, as she doesn't care what color it is, and for photo opportunities there is always Photoshop!

Okay, here are the basics on the Papillon:
It's made of Fabric: 92% Polyester, 8% Spandex
Filling: Polystyrene beads

It's basically bathing suit material filled with styrofoam that is ingeniusly arranged in just the right way to keep baby comfortable moving about the tub or sitting in one place.
It's made in Israel, so subsequently, the "official" website is actually in Hebrew.

What the packaging says:
I have found numerous claims online that this product was "designed by a chiropractor" or "designed by a therapist" but every time I ask these folks what their source for this information was, I come up empty handed.  Either way, it is a fantastic product.

Several sites also claim that it has been "tested and approved by the U.S. Consumer Public Safety Commission", so I did a search:

And I obviously came up empty.  Now, again, I will tell you that this information did not deter me from buying and loving this product, I just don't like passing along misinformation and I will never do that.  What their site does say...when translated from Hebrew is,

 "All products meet the requirements of Apompetes Israel Standards Institute, matching the European standard and manufactured in cooperation with experts in the field of therapy and healing."

The Test:
The product has simple instructions written on the packaging..."simply tie the Papillon around the baby's waist and let the fun begin!"

There are no disclaimers, instructions, etc. which quite honestly came as kind of a relief after buying even the smallest teething toy and having a stack of paper with it!

So...we tied it on!  Vivian was a little hesitant at first, but remember, she had previously been in the Munchkin inflatable duck tub (and loved it).


At first, she was a little gun shy...plus she's teething and exploring everything with her mouth these days so her number one priority was to taste the bath seat, as well as reaching for her toys which she could taste too!  The first time she lunged forward for some toys I got a little freaked out but quickly realized that the Papillon Baby Bath Ring actually somehow shifts position to be under the baby.  Yes, I can't explain it but I have seen it happen!

We are still adjusting to this product, but in general, it is easy to use, well-made, and does what it says it does.  I am excited to watch Vivian learn to use it and enjoy it even more.

We filled the tub about 3 inches...right now while she is in the beginning stages of crawling I would not fill it any more.  Also, I want to stress the importance of staying with your child at all times during bath time.  I have nightmares about the woman who left her child alone in the tub so she could play a game on Facebook..."he really wanted to be left alone; he was a very independent baby".

Do NOT leave your child alone in the tub...EVER!

I did wash the product before using it, and it washed well.  I have been hesitant to hang it from the ties because I don't want to stretch them out or pull them from the main ring.  When I finish with the Papillon Baby Bath Ring I hang it from the spigot from a side that isn't the tie side.  It dries relatively quickly and of course you can re-use it when it's wet (think bathing suit).

It was a little harder to wash her nether-regions while she was in the ring, but worth the trouble.  Also, she had a brief reddening of the skin where the product was tied, I chalk that up to a new fabric on her skin and brief adjustment period.

Total thumbs up on this one...I would not use it if your baby is not yet even attempting to crawl.  I would also say that it requires more supervision because your baby will be so excited to explore the tub he/she will get a little zany in the tub.